Wednesday, April 21, 2010

Bought New Hardware: Microsoft Sidewinder X6 Keyboard, Sidewinder X8 Mouse, Corsair TX650W PSU

I got really tired of using my Logitech S510 wireless  Media remote/keyboard/mouse set for the last 4 years. 4 Years! It has served me well but man was it time for change. Well This time I wanted to get the best of the best (with as usual in a affordable price range). The Razer Mamba and Lycosa set was awesome but too expensive and their server coverage it not much in India so I went with the next best. Microsoft Sidewinder X6 Keyboard, Sidewinder X8 Mouse. I am still keeping the media remote tho :)

I also had a strange problem for the fast 3 months. When ever someone switched on the tube light in my room, my PC froze! Seriously man. It drove me insane and dont even ask how I pinned down that that was what was happening. Totally crazy. An educated guess was that the PSU was not filtering the spikes caused by the flickering of the tube-light when it switches on. I decided to buy a new PSU and a proper one this time. Also a new PSU gives me the ability to add another graphic card (in Dual SLI mode) which would give my aging PC a new lease on gaming life. You can imaging how sad I felt when I tried out the game Metro 2033. It has minimum sys requirements that are my PC specs! So sad. My (once) top of the line gfx card was fading away, even before its warranty ended.

Anyway, here is my take on the three main items I purchased.

Microsoft SideWinder X8 Wireless Gaming Mouse

Trust me gaming grade wireless mice are no simple piece of hardware. This sweet mouse can track on anything (M$ even tested it on human hair) and it has this awesome magnetic charging cord that gently snaps into place when bought near the mouse! no fumbling around for the cable in the dark. It also provides a break free transition from wireless and wired mode and you never have to worry about batteries again. Oh and it tracks at 4000 DPI o_O.


Microsoft SideWinder X6 Macro and backlit Keyboard, detachable numpad

One thing I have learned, you cant have enough keys on a keyboard! And this one has a whole bunch of extra keys. the numpad can be removed and attached to either side of the keyboard and can be converted into a macro pad with each key programmable. Though the pretties and the coolest thing I liked right in the beginning is the backlighting. It is insanely cool! They also have a near knob that can change the brightness of the backlight, which is awesome and I also liked the fact that this monstrosity also has media buttons and a volume knob and a whole bunch of keys that can be programmed on the fly!

One thing I hated was (might be a mis-config on my part). The macro keys dont work in visual studio. i.e they dont fire the macros. So sad. It is a priority for me to find a fix.workaround for that. You can imagine the usefulness for programmable keys for coding. Imagine a button to insert a button control from the toolbox :D and other super cool things that we can never remember the shortcut for.

It is amazing the power so many macro keys bring. When surfing, use a dedicated key to open up google search, another to open youtube  and another to initiate a new compose window in gmail. It is a huge benefit and I couldn't possibly switch to a standard keyboard now. It would feel like a handicap.

Corsair TX650W 650 Watt Power Supply

This baby is Single Rail, 80% efficient with active power correction. Super quite and very sturdy. The best part is it comes with a 5 year warranty! That is a loooong time. I doubt anyone was to hear much about power supplies so I will keep it simple and just show you some pics-

75123d1213047732-corsair-650w-tx-sm1[1] CMPSU-650TX_1[1] corsair_tx650w_label[1]

I purchased all these from logo[1]. They have good customer service and great prices. But best of all they have a lot of cool products available. The only drawback is their shipping costs are a bit higher as they are in south and I am in north India and they only use सरकारी SpeedPost to send across state borders.

Here are some videos

Sunday, March 07, 2010

Add Calibre libraries to Windows search Indexer and use it efficiently - (The Modern Reader Series - A guide to getting more out of Calibre – Issue #2)

Windows Indexing service is an operating system level service that maintains an index of most of the files on a computer and updates them without user intervention. To Modify your indexing options:

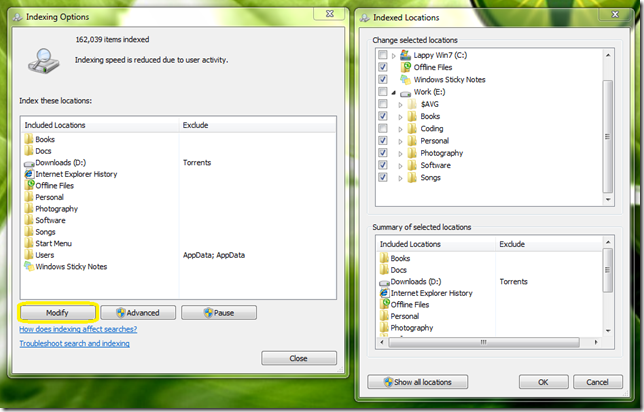
  1. Open the start menu and start typing “Indexing Options”. It should appear in the results. Select it to open
  2. You should see a list of locations already being indexed. Click the Modify Button.
  3. In the new window select the folders you want to index and press OK to save.

IndexingOptions

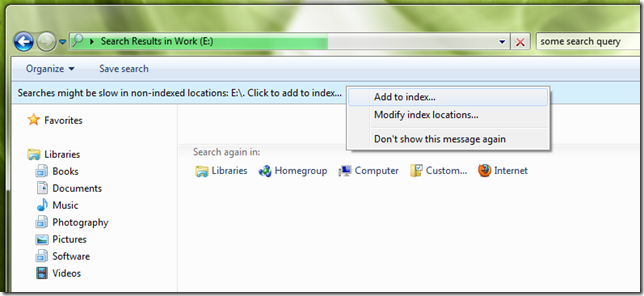
Or alternatively, when you are searching a location in explorer that is not indexed, you get a yellow bar at the top asking you to add it to the indexing service. Right click on that yellow bar and select ‘Index this location’.

IndexingOptions2

Now that you have indexed you calibre libraries it is time to have fun with the searches. I recommend reading  this short tutorial about windows searches and available operands like AND OR etc before continuing. (Power users: Advanced Guide)

We all agree that calibre does a great job of managing out ebooks and what not but in my personal opinion, calibre’s search and presentation is more targeted towards a user who knows what he is searching for. Say I want to see all the books in the Dune Series. I can go ahead and quite easily do that in calibre. But what about the peruser user. In today’s world an average personal library may hold anywhere from 1000 to 10000 books depending on how mad the owner of the library is :) . How about when you want to see the books you read in the last 2 weeks? or a list of reference books that one would want, usually, on a moments notice? etc etc… Well I have tried here to make some of those easy. Read on dear ebook worm (Open Explorer and navigate to one of you libraries. Now in the search box enter one of the following)

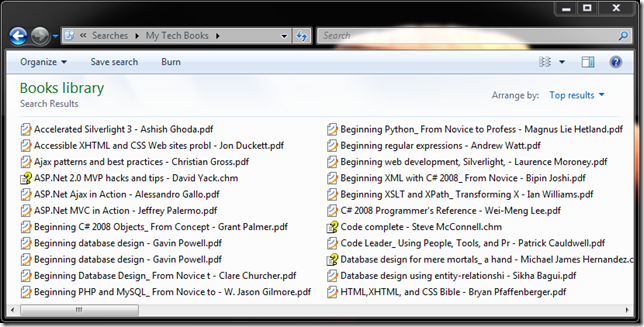
List all the books in a library -

NOT type:"file folder" NOT name:cover.jpg NOT name:metadata.db

tech books 

This works best when you want to quickly access a book and don’t want to wait for calibre to load. I use it all the time to access my tech books library. For smaller libraries such as a tech books library or an encyclopaedia this work very efficiently and the search is very fast. So create a separate calibre library for this kind of categories.

Create and save a search for recently accessed books -

date:thismonth OR date:lastmonth NOT type:"file folder" NOT name:cover.jpg NOT name:metadata.db

You should then see a list of all the books that have accessed this month or last month. Pretty Neat? :)

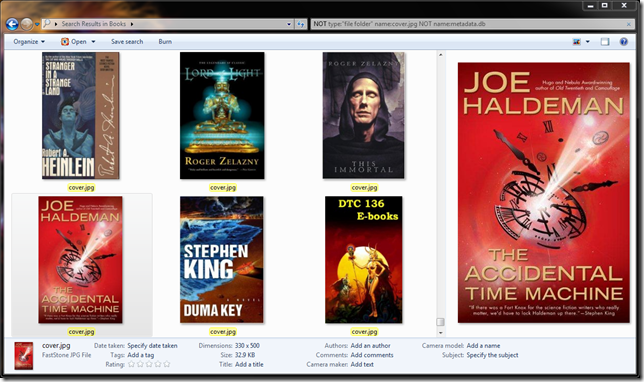
Browse the covers as if it were a bookshelf - 

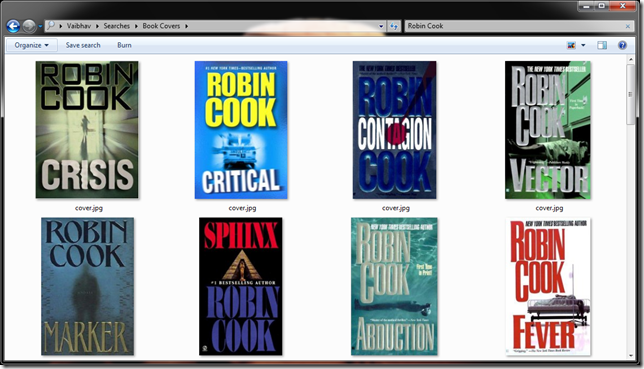
NOT type:"file folder" name:cover.jpg NOT name:metadata.db

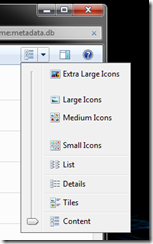
Select the “Extra large Icons” view option and you have a bare minimum of a bookshelf here.

  • I find this a very good way to browse thru what I have as it is much faster then calibre’s cover browser
  • I have found many interesting items to read that I added to the library and forgot.
  • This is also useful to remove useless covers like some group covers or default covers added to .lit files
  • Use the Preview Pane to see larger versions of the covers
  • Hide the navigation pane and the details pane and use full screen (F11) for best results
  • If you save this search(see below) Most newer applications like Windows Preview will treat it as a folder

Bookshelf

Save a search for easy future access -

For all of the above and any custom searches you make, you can save them. Just go ahead and click “Save Search” button in the explorer toolbar and give it a friendly name like “Recent books” or “My Covers” etc. This will add the search to you favourites(can be removed) and save it in the Searches folder under the current user (Start menu>[CurrentLoginName]>Searches). This way you can use the search as if it were a folder and apply additional search filters like by type or size and use various sorting and grouping options.

Filter Covers by Author-

For e.g., Navigate to you searches location and open “My Covers” and in the empty search box enter an author and see the magic happen. This will work even better with recent listing and book listing search above. (only work for author names due to the folder structure of calibre).

 Author

Use Saved searches smartly -

This technique can be used in countless ways like when you want to search for -

  • Authors : add author name e.g. “Robin Cook” to a saved search or ‘ name:”Robin Cook” ’
  • Title: add “name:dune” to list all books with “dune in their title”
  • Format: add “name:.mobi” or ‘ type:”MOBI” ‘ or “name:.lit” or ‘ type:”LIT” ‘
  • You can in fact use any column name in the format  columnname:”query” (note: remove space from column name like Date Modified becomes datemodified) See Rigth-Click in empty area> Sort/Group>More.. for a list of columns

Other options for cooler searches yet -

  • ViewsViews_s Use different View options to make the results more pleasing and fun
  • Preview_s Use the preview pane as windows can show content preview for some file types like text, rtf, doc, images etc
  • Right-click in an empty area and choose Sort By to get neat results. such as by folder or by name or size
  • Right-click in an empty area and choose Group By to group the search results. Very useful for separating by type so that you see all mobi files in one group and pub files in another
  • use the More… option in Sort, Group and Details View options to access from a ton of file property options.
  • You can increase the size of the search box by dragging the divider to the left of the search box
  • To view the location of a file in the search results Right Click>Open File Location (Press shift for a new window)
  • Indexing service also searches inside books it can read like txt, rtf, doc etc. If you dont want to search inside files then add column names to you searches. e.g. search for “name:dune” instead of “dune”

I think I have list a lot of options for you to play with and as it may be apparent it is just a beginning! Discover searches of your own and share

Friday, March 05, 2010

Jumplist for Calibre: The eBook Management Software - (The Modern Reader Series - A guide to getting more out of Calibre – Issue #1)

I am a reader. You are a reader. Everyone is a reader and Calibre is open source! Aren’t we living in a golden age?

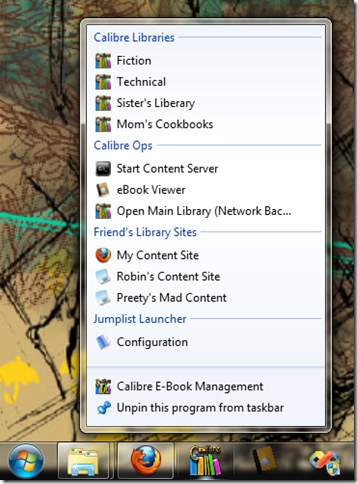
Calibre is a great application and it belongs to the community, but this also means that the community is in return responsible for calibre and its development. I was thoroughly impressed by it the first time I used it and am still surprised by its modular flexibility and potential. So I decided to participate and try to make the ‘calibre experience’ more smarter as that seems to be the mantra of this age.  So I have decided to start with a simple yet powerful tip for Calibre Users in the form of utilizing Win7’s Jump list feature. Here is does….

Aim : Facilitate launching of calibre and related tools with different start parameters.

Side effects : Multiple libraries, Integration in Windows 7  using Jumplist feature, Easy of launching and grouping calibre related links

Requirements: Calibre eBook Management Software, Windows 7, Hedgehog’s JumplistLauncher (Download 476.6 KB), (Administrator Privileges may be required based on the location of the installation of the launcher)

Limitations: Only runs on Windows 7

Setting Up Icons:

  1. Open Explorer with Ctrl+Shift to start it in Admin mode and Navigate to calibre’s installation directory (usually C:\Program Files\Calibre2)
  2. Create a new folder and Extract JumplistLauncher e.g. C:\Program Files\Calibre2\Jumplist   (power user tip: can be anywhere, can have multiple installs)
  3. Right Click on JumplistLauncher.exe and select “Create Shortcut”. Select yes when asked to place on desktop. You can optionally cut-paste the shortcut back in the jumplist folder.
  4. Rename the shortcut to “Calibre E-Book Management”. Optionally change it’s Icon to use calibre’s. See tutorial to change icon here
  5. Right click the shortcut and select “Pin to Start Menu”
  6. Right click the shortcut and select “Pin to Taskbar” (drag the icon to your preferred location)
  7. The Icons should appear on you task bar as well as in start menu. Congratulations you are half done.

Setting up Jumplist items:

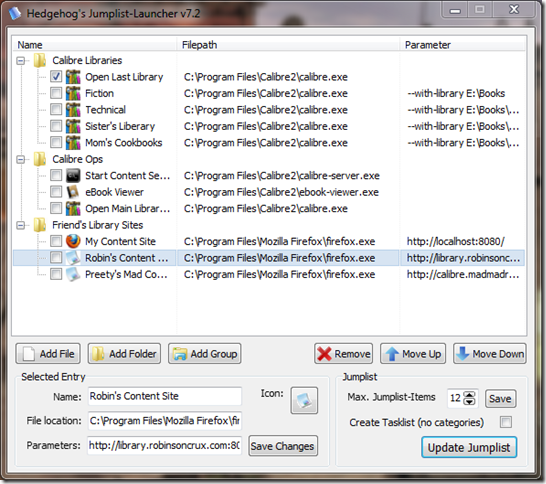
  1. Press Ctrl+Shift and Click on the new icon to start the JumplistLauncher interface in admin mode. (Don’t worry if yours is empty, We are going to create these links.)Launcher
  2. Add Items to the jump list
    1. Click the ‘Add File’ button to create a new item.
    2. Browse to calibre’s executable (C:\Program Files\Calibre2\calibre.exe) and press ‘Open’
    3. In the ‘Selected Entry’ field group you can specify the name of you choice. for e.g ‘Calibre’
    4. In the ‘Parameters’ field add command line configuration parameters. 
      1. To launch calibre with another library location then default enter “--with-library <path>” where <path> is the path to that library e.g. E:\Books\Library2 . See the official support guide for more parameters.
      2. To add a URL (for e.g. a friend’s content server) use a browser’s exe for the file and the URL for the parameter. For e.g. I used Firefox with is normally located at C:\Program Files\Mozilla Firefox\firefox.exe
      3. Add Calibre-server.exe to easily start your content server. see available params
      4. If you have a skydrive, network backup etc, you can specify it’s path for the library
      5. If you use the various modular executable in calibre’s directory, create batch files for common tasks and add them by creating a shortcut with the Run minimised option
    5. Optionally change the icon of the jump list item by pressing the icon button.
  3. Use the ‘Add Group’ button to great sections in the list. To edit a group’s name click on it in the list and it changes to a editable textbox.
  4. Selecting one of the checkboxes in the list makes it the default launch operation when clicking on the icons we added to the task bad and start menu. If none is selected then this configuration window opens up.
  5. Press the ‘Update Jumplist’ button to same you options and update the jump list without restarting the launcher.
  6. Exit the configuration  window and you are done!

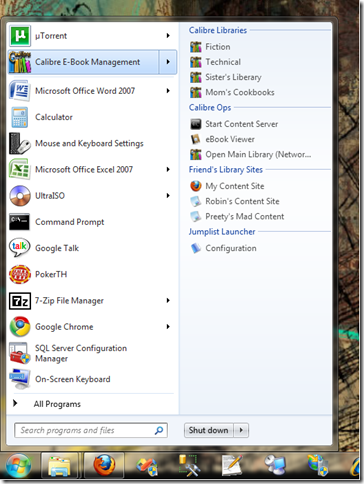
StartMenu Jumplist Taskbar Jumplist

I hope this is a very helpful tutorial and will go a long way to utilizing calibre to its full potential. I will be create more posts and tutorials in the future so please send me feedback on the calibre’s mobileread forum or here.

Friday, February 26, 2010

My Application Owns the Computer!

pc_trouble[1] A pervasive attitude among programmers is that the only reason people own a computer is to run their application. Symptoms include:
  • Usurping shared resources like the desktop, system folders, task bar, registry, ... ("The whole machine is for my use.")
  • Can't turn off the app ("The only reason the machine would be on is to run my app, so I'll install an auto-startup service, a startup app, an Explorer plug-in, ...").
  • Resource hogging ("I can just grab exclusive access to files, database, or network connections when I launch and keep everything open.")
  • Interrupts workflow with pop-up messages, tooltips, alert balloons, taskbar messages, status messages, sound effects, ... ("Look at me! I'm working! Do you see me? I'm doing something!!")
  • Collateral damage ("I don't use that so I'll delete it.")
  • Race conditions ("Anything I do will stay that way forever until I change it.")
  • Security breaches ("I can expose everything on the machine, since I am the only one that will ever access it.")
  • Lack of interoperability ("My app has everything it needs so I don't need to support file export or cut and paste.")
  • No deployment ("I will never have to update or uninstall my app; they'll just get a new machine.")

Monday, February 15, 2010

IRCTC’s new face

Online booking is now very common and more appreciated then the brainless babus on the counters and the sweaty, slow moving lines they rule on. But Indian sites have really stayed behind in providing a clean and effective consumer experience. Who doesn’t curse a few times when using the IRCTC site or other govt sites. But the new beta interface seems to be on track. Have a look -

IRCTC

It is no longer a mad struggle between a bunch of pages and little popups. You don’t have to ‘Find Trains’ every time for different kind of seats like Chair Car or Sleeper Berth. It is really better now. they have gone with the generic booking design with a From/To/Date panel on one side and trains in the rest. The great part is when you click on a radio button for a train/type, it immediately loads the relevant info like Fair and Availability.

Though, I also think it is looking so good now because their previous interface was so damn dirty and clunky. Like a bully, the norm is getting picked on and the day that stops it feels extraordinary. But dear, that is what is ordinary supposed to be!

So IRCTC seems to be reaching ‘ordinary’ level which is extra ordinary based on previous experience!

PS: the link to the beta interface is in the top right corner of the homepage.